Exploring APIs with Postman: Your Interactive Testing Toolkit
You've successfully written an automated API test in C#! That's a huge achievement and a cornerstone of professional test automation. But what happens when a test fails? Or what if you want to quickly understand how a new API works before you even start writing code?
For that, we turn to an industry-standard tool that belongs in every tester's toolkit: Postman. Think of it not just as a request sender, but as your interactive workbench for everything related to APIs.
While Postman offers advanced capabilities like mock servers, performance monitoring, and a command-line runner (Newman), this lesson zeroes in on the essentials. Our focus will be on hands-on exploration and sending basic requests – the building blocks of effective API testing. You won't see every feature today, but by the end, you'll have the confidence and foundation to explore Postman's full potential on your own.

A Tale of Two Toolkits – Postman vs C# Tests
It's crucial to understand that Postman and C# test suites are complementary tools, not competitors. A professional tester is fluent in both and knows when to use each for maximum effect.
Postman's Strengths & Use Cases
Think of Postman as your go-to tool for interactive, real-time tasks.
- Rapid Exploration & Discovery: This is Postman's superpower. You can instantly send a request to a new endpoint, tweak parameters, modify headers, and see the response in seconds. It's the fastest way to learn how an API behaves without the overhead of setting up a project.
- Debugging: When your C# test fails with an unexpected
400 Bad Request, don't just stare at the code. Replicate the exact request in Postman. You can visually inspect every part of the response – headers, body, status code – to instantly pinpoint the problem. - In-Request Assertions: Postman allows you to write lightweight JavaScript tests directly on a request. This is perfect for quick sanity checks ("Does this endpoint return a 200 OK?") or basic contract validation ("Does the response body contain a
userIdproperty?"). - Collaboration: You can easily share a Postman Collection with developers to demonstrate a bug with a ready-to-run request, or with other testers to provide a set of examples.
C# Automation's Strengths & Use Cases
Your C# test suite is your industrial-strength tool for long-term quality assurance.
- Comprehensive Regression Suites: This is where code shines. You can build large, robust test suites with thousands of tests that cover complex business logic and run automatically every time code changes.
- Full SDLC Integration: C# test projects integrate seamlessly into your .NET build and CI/CD pipelines (like Azure DevOps or GitHub Actions). They become a native part of your development lifecycle.
- Complex Logic & Data Handling: C# is a full-fledged programming language. It's the right tool when your tests require complex setup, conditional logic, loops, generating data from a database, or integrating with other systems to prepare a test state.
Your First GET Request & Response Analysis
Let's get hands-on. If you haven't already, download and install the Postman desktop application. Once you have it running, follow these steps to make your first API request:
- In the main workspace, click the + ("Create New Request") button to open a new tab.
- Leave the HTTP method dropdown set to
GET. - In the URL bar, enter:
https://jsonplaceholder.typicode.com/posts/1 - Click the blue Send button.
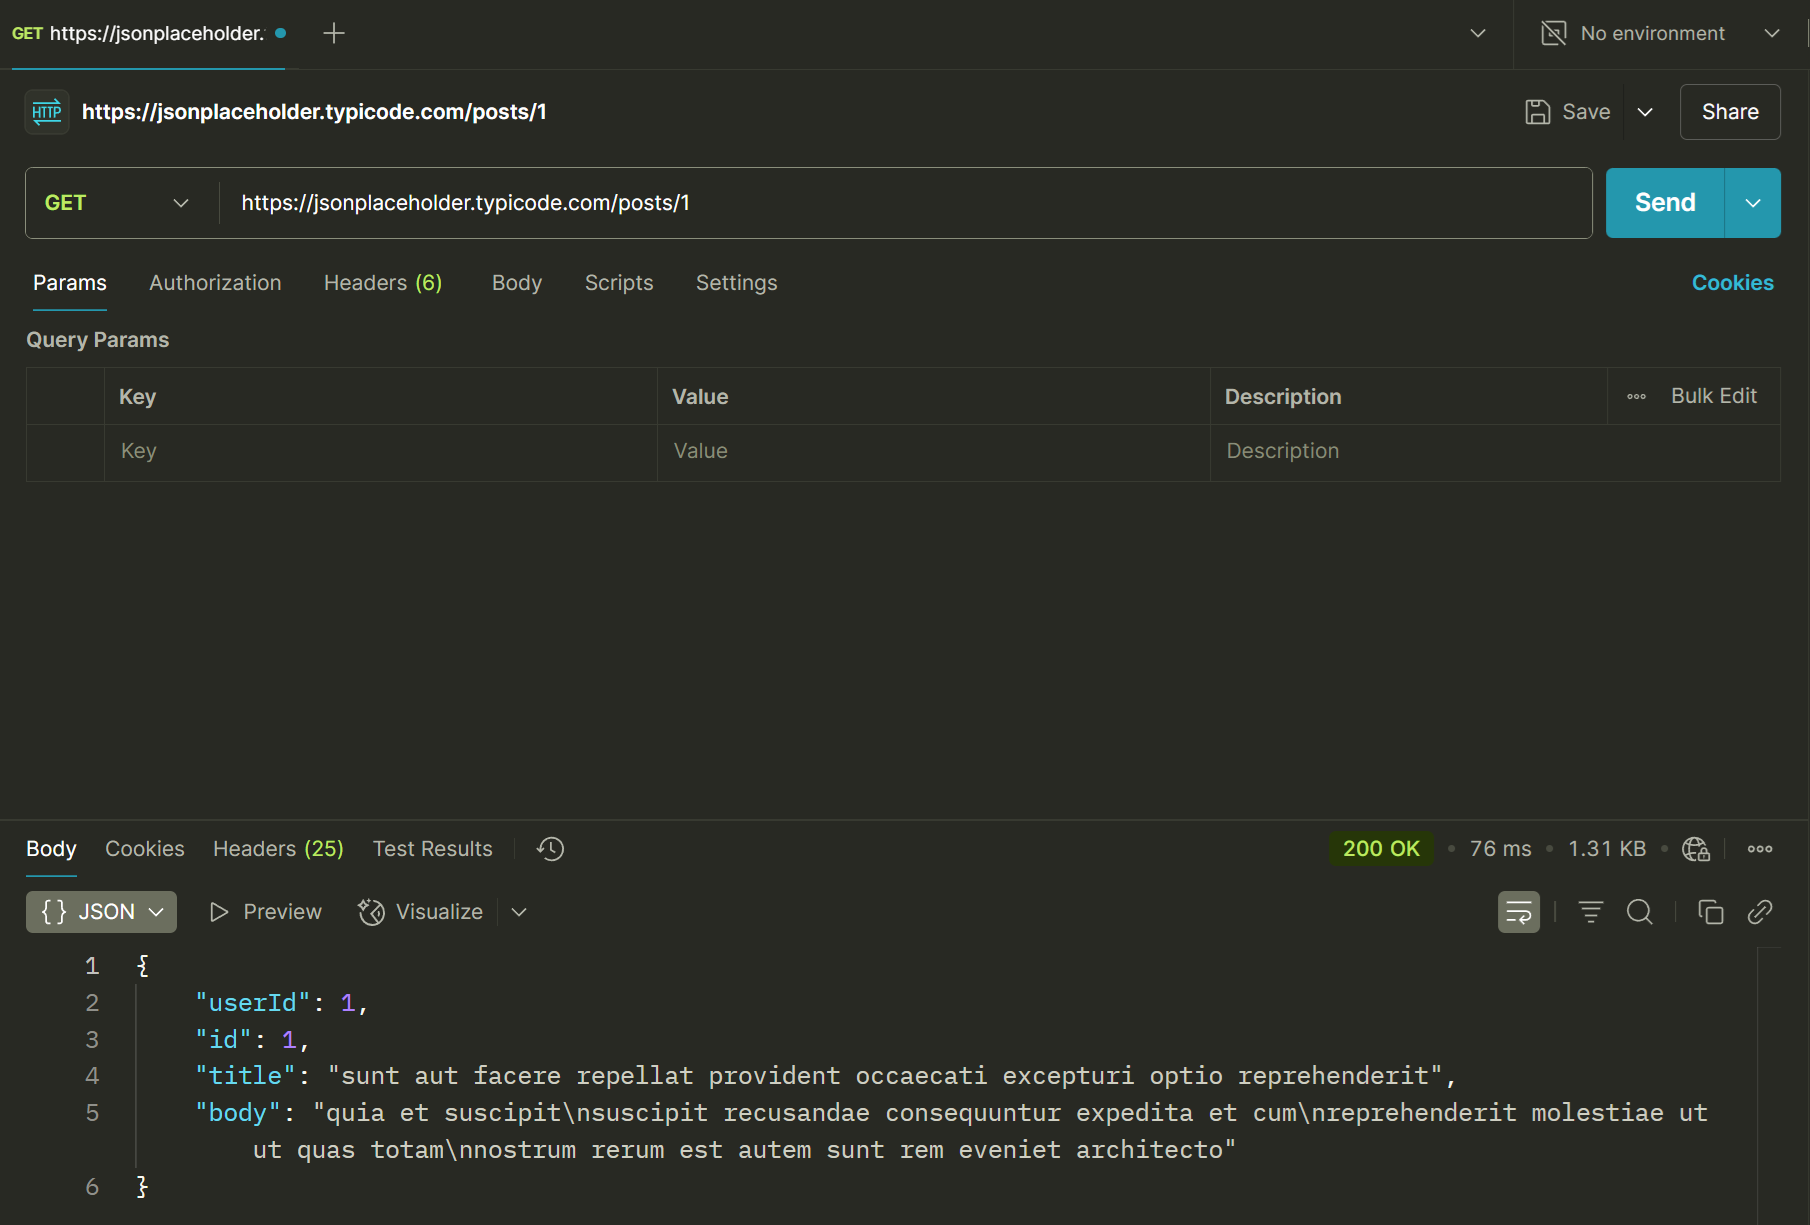
In a moment, the bottom pane will populate with the API's response. Take a minute to explore this area:
- Body Tab: This is selected by default. You should see the JSON response, nicely formatted and color-coded.
- Status Code: To the right of the tabs, you'll see the status, like
200 OK, along with the response time (e.g., 150ms). This is your first and most important piece of feedback. - Headers Tab: Click this tab to see all the HTTP headers that came back with the response, such as
Content-TypeandDate.
Writing Your First Postman Test
Now, let's add a simple check to that request. Postman allows us to write tests in JavaScript that run after the response is received.
- With your
GETrequest open, click the Scripts tab below the URL bar. This opens a code editor. - On the left side of the editor, you'll see a sidebar with two options. Select the Post-Response option.
- In the right bottom corner of the editor, you'll see a panel labeled Snippets. This is a huge time-saver!
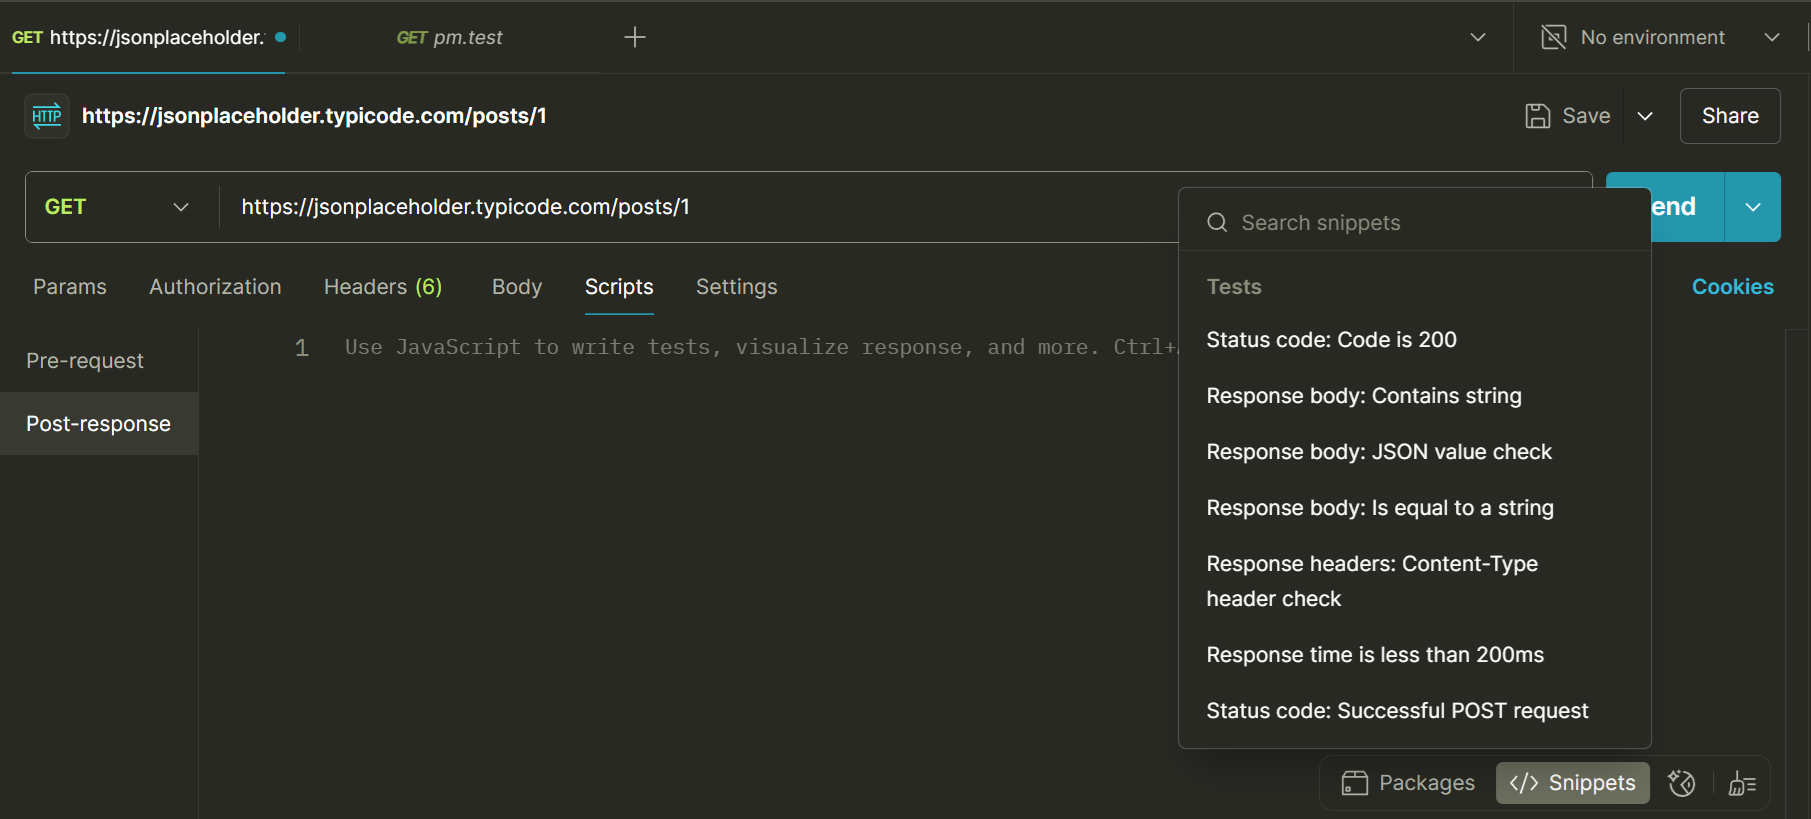
- Click the snippet named Status code: Code is 200. You'll see JavaScript code instantly appear in the editor.
- Now click the snippet named Response body: JSON value check. Another block of code will be added.
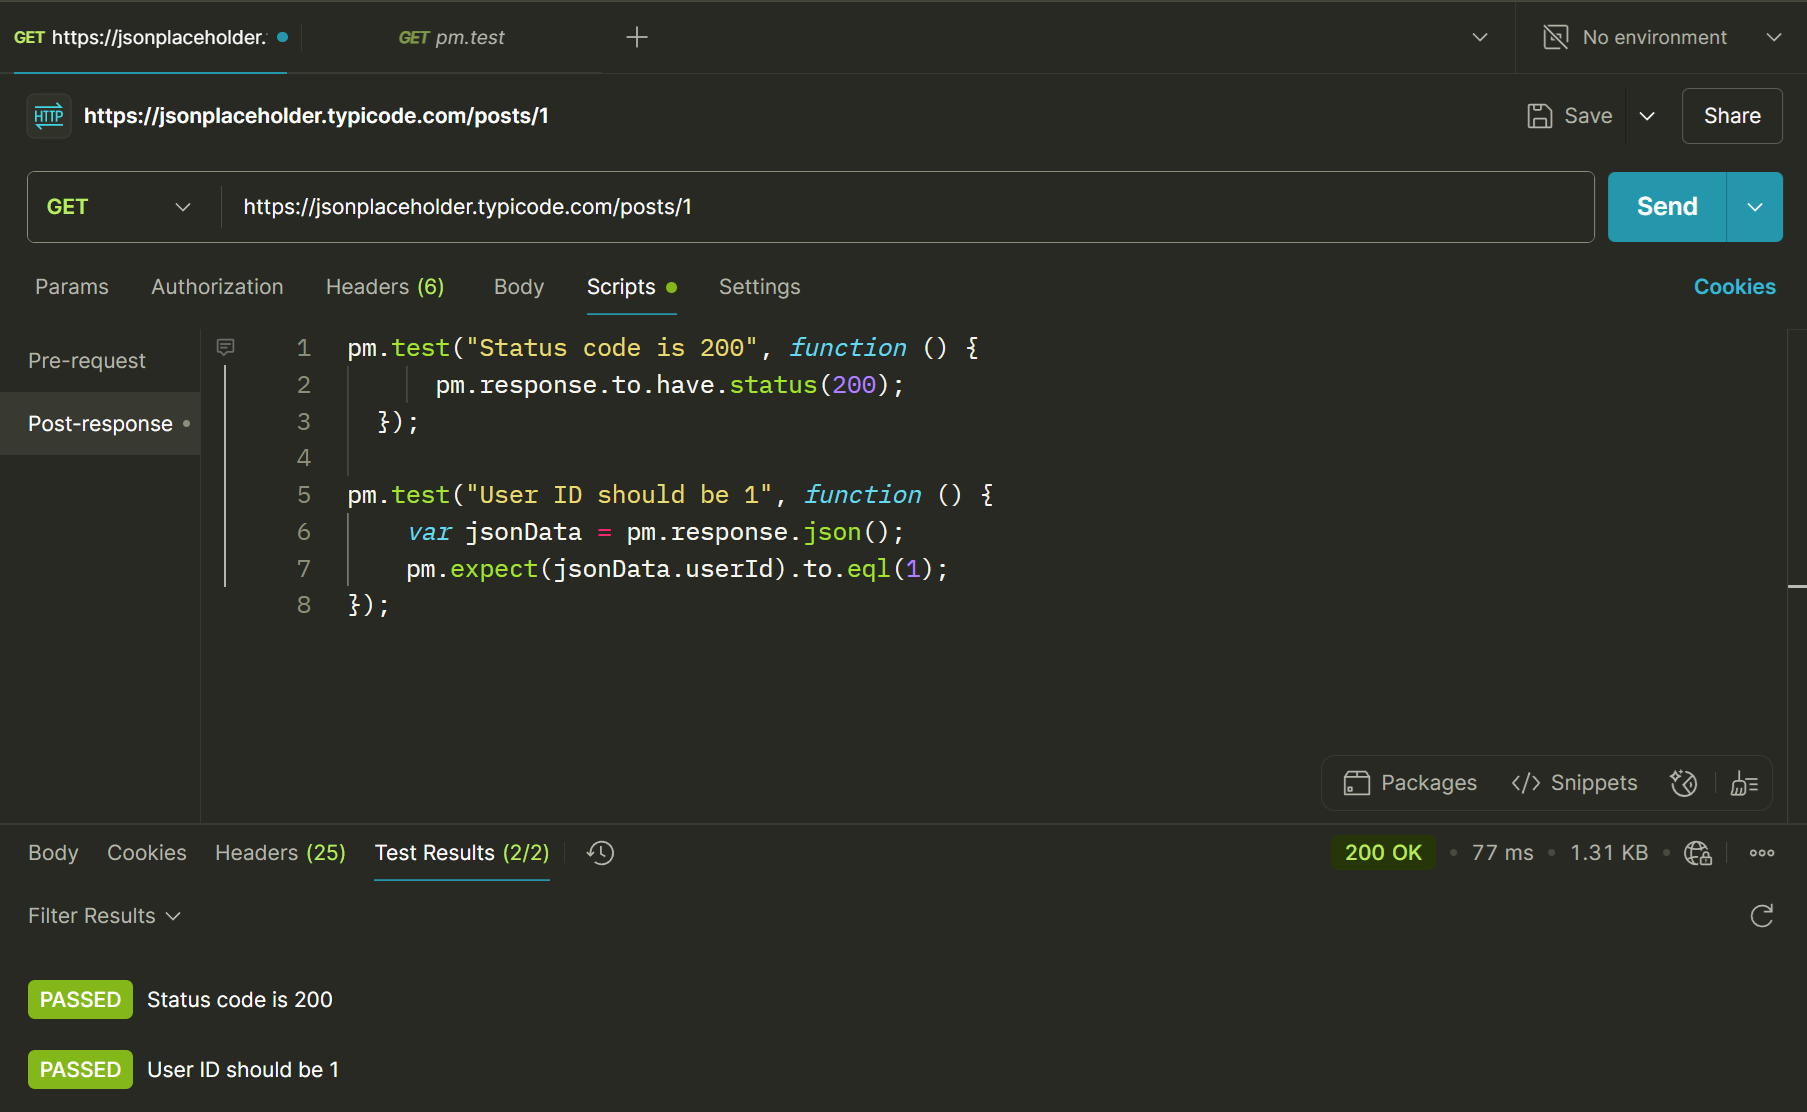
- Let's change the name of the second test and the test property to check a specific value from our response. Your test script should look like this.
pm.test("Status code is 200", function () { pm.response.to.have.status(200); }); pm.test("User ID should be 1", function () { var jsonData = pm.response.json(); pm.expect(jsonData.userId).to.eql(1); }); - Now, click Send again. Look at the response pane and click the Test Results tab. You should see your two tests listed with a PASSED status. Congratulations, you've just written your first automated check in Postman!
Staying Organized and Creating Data
As you work with more requests, you need to stay organized. Postman's core features for this are Collections and Variables.
- Collections: These are simply folders for your requests. You should always group related requests into a collection (e.g., a "JSONPlaceholder API" collection).
- Variables: These let you store and reuse common values, like a base URL or an authentication token. This is a critical practice to avoid hardcoding values.
Let's create a POST request to add a new post, using variables from the start.
- Click the + next to your request tabs to create a new collection. Name it "My API Tests".
- Select the new collection, and go to its Variables tab.
- Create a new variable named
baseUrland in the Current value column, enterhttps://jsonplaceholder.typicode.com. Click Save.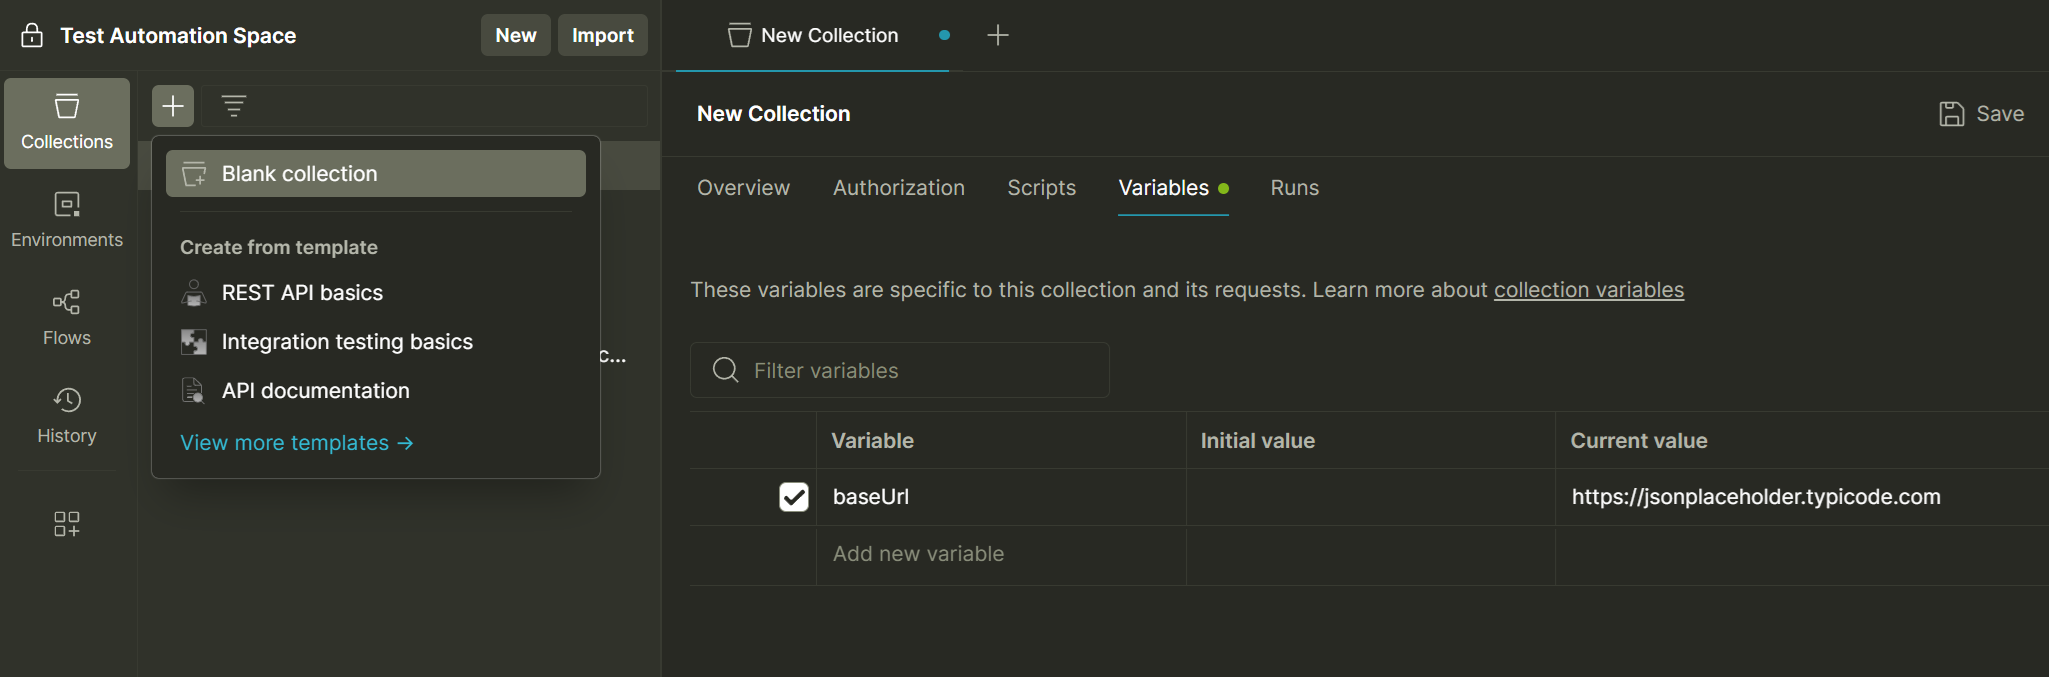
- Create a new request. Change the method to
POSTand set the URL to{{baseUrl}}/posts. The double curly braces tell Postman to use your variable. - Click the Body tab below the URL. Select the
rawradio button and from the dropdown that appears, chooseJSON.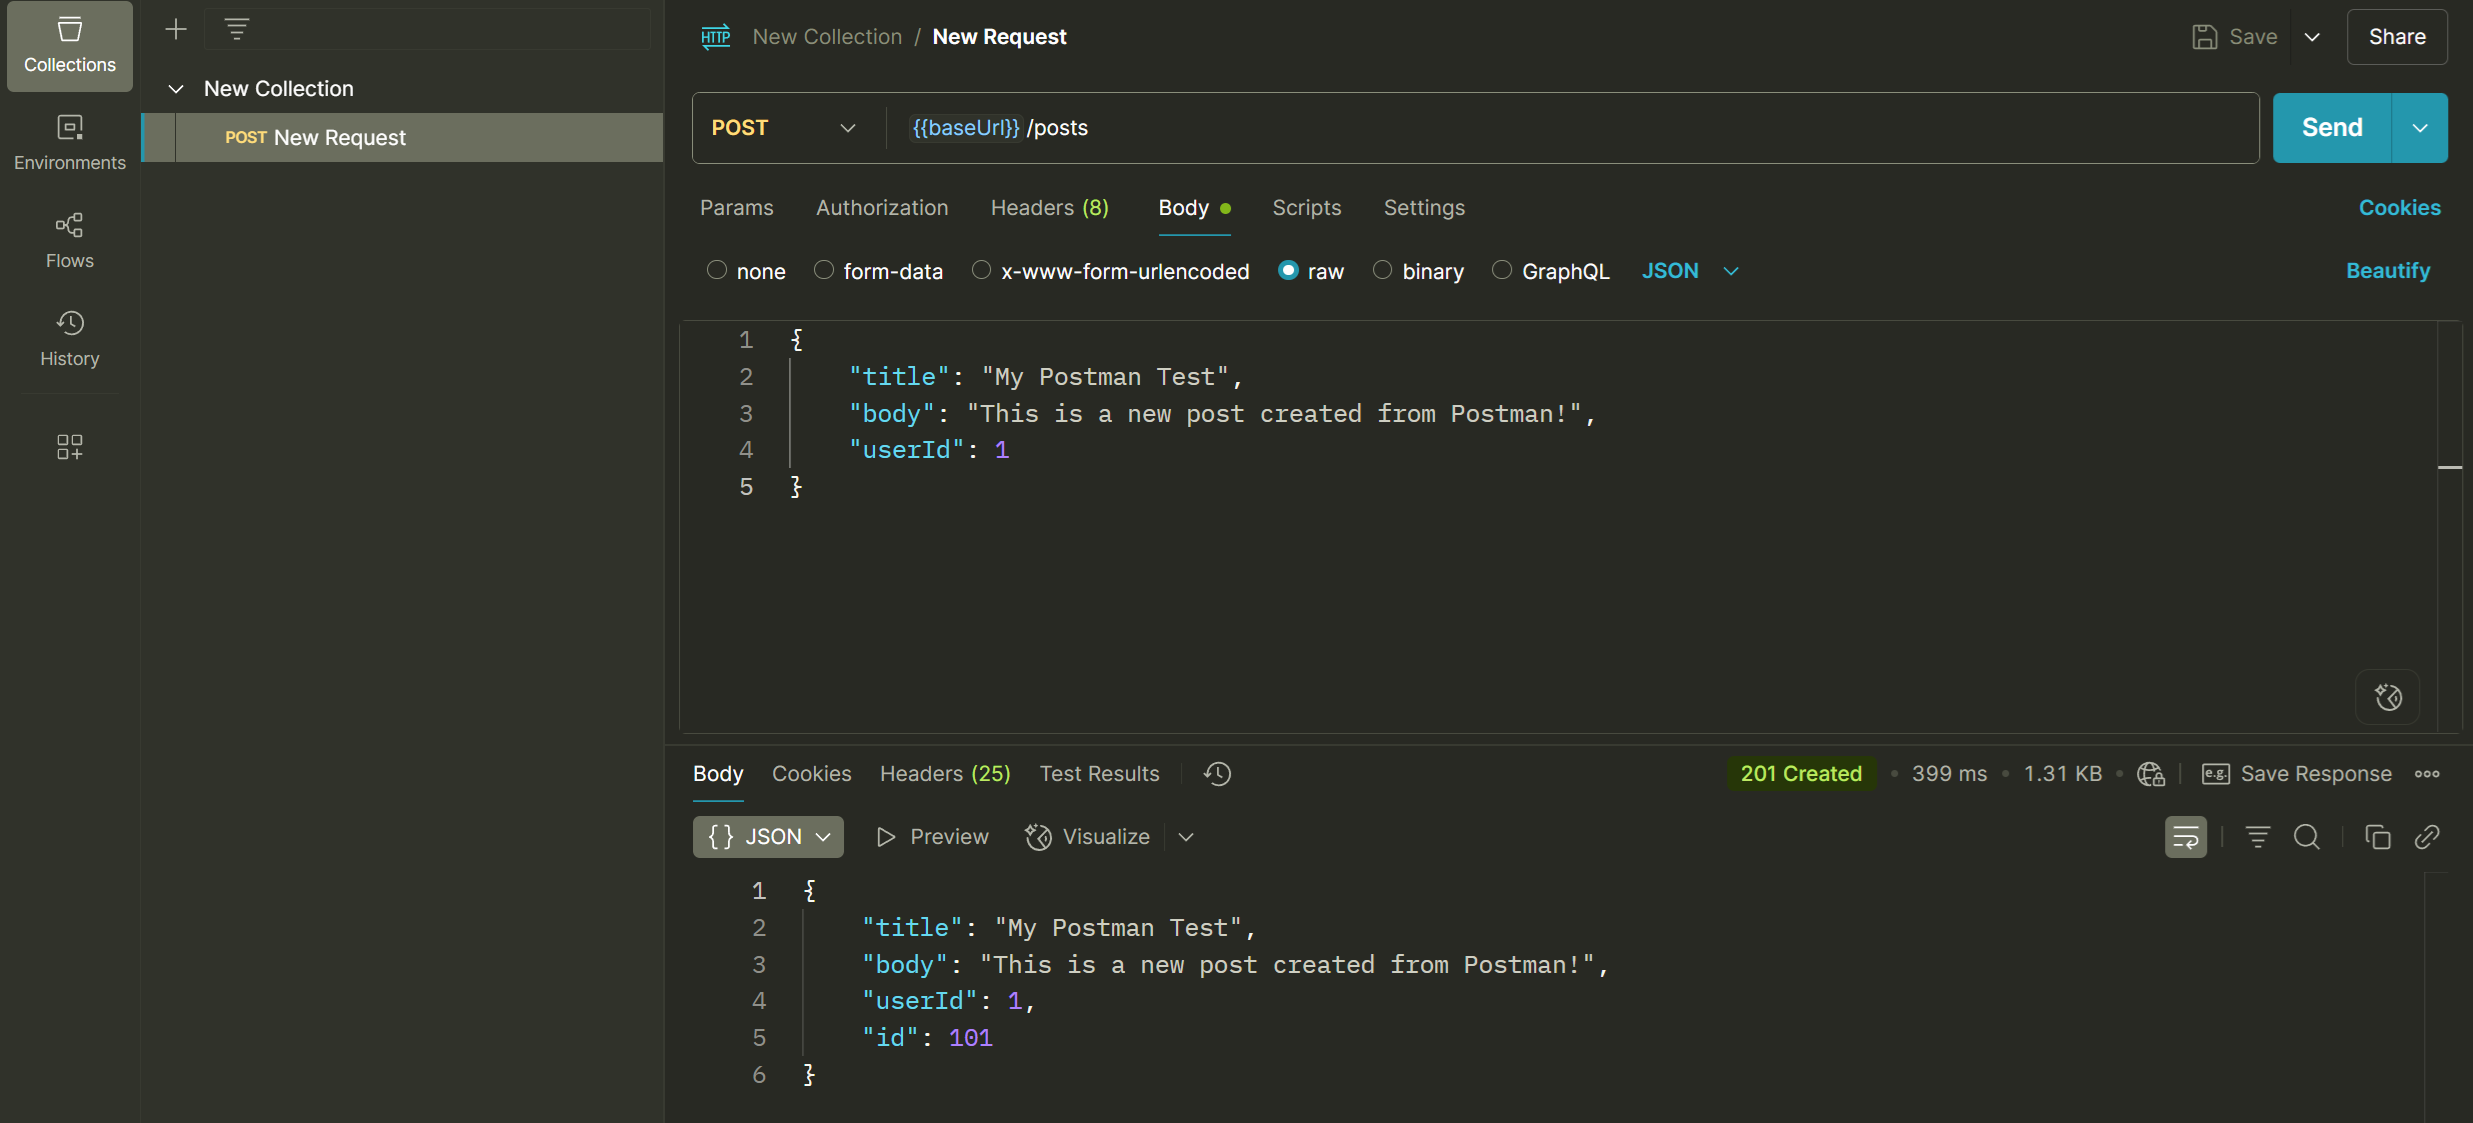
- Paste the following JSON into the text area:
{ "title": "My Postman Test", "body": "This is a new post created from Postman!", "userId": 1 } - Click Send. You should get a
201 Createdstatus code, and the response body will show your post with a newid. As a challenge, try adding tests to this POST request to verify the status code and check that thetitlein the response matches what you sent!
Key Takeaways
- Use Postman for rapid exploration, interactive debugging, and writing quick, targeted API checks.
- Use C# test automation projects for building robust, scalable, and fully integrated regression suites that test complex business logic. The two tools work together.
- The Postman Tests tab allows you to write simple JavaScript assertions using helpful snippets to validate responses immediately.
- Always organize your requests into Collections and use Variables (like
{{baseUrl}}) to avoid hardcoding values and keep your workspace maintainable.
Mastering Postman
- Postman Docs: Write scripts to test API response data A deep dive into the test script sandbox, with many more examples of assertions you can write.
- Postman Docs: Using variables Learn more about the different variable scopes (Global, Collection, Environment) to manage your data.
- Postman API Platform: API test automation Explore the API Lifecycle and the role of test automation.